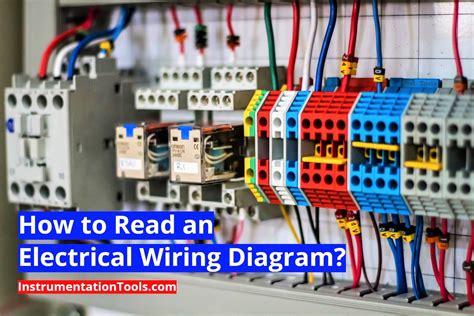
Unlock Your Car's Potential: Explore the 2003 Saturn L200 Fuse Box Diagram! Explore the 2003 Saturn L200 fuse box diagram for a comprehensive understanding of your vehicle's electrical system. Unlock insights and troubleshooting tips! Unlock Your Car's Potential: Explore the 2003 Saturn L200 Fuse Box Diagram! Explore the 2003 Saturn L200 fuse box diagram for a comprehensive understanding of your vehicle's electrical system. Unlock insights and troubleshooting tips! Curious about the inner workings of your 2003 Saturn L200? Delve into the intricate details of its fuse box diagram, unlocking a world of automotive knowledge. With clear instructions and comprehensive visuals, you'll navigate through the electrical system with ease. Transitioning seamlessly from curiosity to understanding, this guide empowers you to troubleshoot and maintain your vehicle like a pro. From identifying fuse locations to deciphering circuit configurations, each step is accompanied by he...
Revamp Your Ride: Discover 1987 TRX 250 Wiring Schematics for Peak Performance!


Optimize your 1987 TRX 250's performance with detailed wiring schematics. Unlock the secrets to troubleshooting and enhancing your ATV's electrical system.
Revamp Your Ride: Discover 1987 TRX 250 Wiring Schematics for Peak Performance!Optimize your 1987 TRX 250's performance with detailed wiring schematics. Unlock the secrets to troubleshooting and enhancing your ATV's electrical system.
Unlock the secrets to optimizing your 1987 TRX 250's performance with detailed wiring schematics. Delve into the intricate wiring system that powers this iconic machine, and discover the key components that keep it running smoothly. By understanding the wiring schematics, you gain insight into the heart of your TRX 250, empowering you to troubleshoot issues effectively and make targeted improvements. From enhancing electrical efficiency to ensuring safety on every ride, these schematics serve as your roadmap to maximizing the potential of your beloved ATV. Take control of your riding experience and unleash the full power of your 1987 TRX 250 with comprehensive wiring schematics at your fingertips.
Unveiling the Mysteries of 1987 TRX 250 Wiring Schematics
As enthusiasts and mechanics alike delve into the inner workings of the 1987 TRX 250, one crucial aspect often stands out: the wiring schematics. These blueprints serve as the backbone of the ATV's electrical system, dictating its functionality and performance. Let's take a closer look at these schematics and unravel the complexities they hold.
Understanding the Wiring Layout
The wiring layout of the 1987 TRX 250 is akin to a roadmap, guiding electric currents to their intended destinations. Each wire serves a specific purpose, whether it's delivering power to the engine or illuminating the headlights. Understanding this layout is fundamental to grasping the overall functionality of the ATV's electrical system.
Identifying Electrical Components
Within the labyrinth of wires lie various electrical components that keep the TRX 250 running smoothly. From ignition coils to voltage regulators, each component plays a crucial role in ensuring optimal performance. Identifying these components is essential for troubleshooting and maintenance purposes.
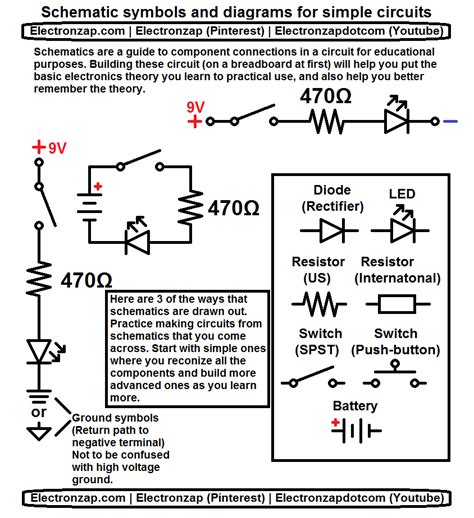
Deciphering Wiring Codes and Colors
Wiring schematics are often accompanied by codes and colors that signify different functionalities and connections. Deciphering these codes is akin to decoding a secret language, allowing mechanics to make sense of the intricate wiring system. Understanding the significance of each color and code is key to effectively navigating the schematics.
Tracing Power Paths
The power paths outlined in the wiring schematics map the journey of electrical currents throughout the ATV. From the battery to various components, tracing these paths helps diagnose issues such as voltage drops or short circuits. It's akin to following a trail of breadcrumbs to uncover potential problems.
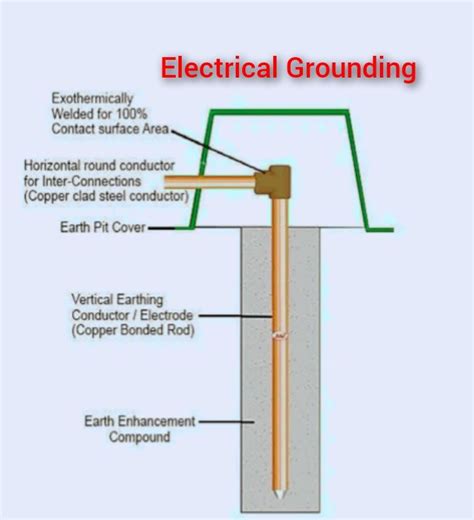
Locating Grounding Points
Grounding points serve as the anchor for the electrical system, providing a path for excess electricity to dissipate harmlessly into the ground. Identifying these points ensures proper grounding, preventing electrical malfunctions and potential hazards. They are the foundation upon which the entire electrical system relies.
Interpreting Circuit Diagrams
Circuit diagrams provide a visual representation of the electrical connections within the TRX 250. By interpreting these diagrams, mechanics can gain insights into the flow of electricity and pinpoint potential areas of concern. It's like solving a puzzle where every connection holds significance.
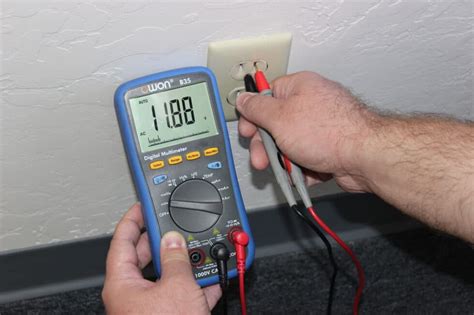
Testing Voltage and Current
Testing voltage and current levels is a critical aspect of troubleshooting electrical issues in the TRX 250. By using multimeters and other diagnostic tools, mechanics can measure the flow of electricity at various points within the system. This hands-on approach is essential for pinpointing faults and ensuring optimal performance.
Diagnosing Common Electrical Issues
Despite its robust design, the 1987 TRX 250 is not immune to electrical issues. From faulty connections to worn-out components, a myriad of problems can arise over time. Understanding common electrical issues and their root causes is essential for prompt diagnosis and effective resolution.
Exploring the intricacies of the 1987 TRX 250 wiring schematics:
- Understanding the Wiring Layout
- Identifying Electrical Components
- Deciphering Wiring Codes and Colors
- Tracing Power Paths
- Locating Grounding Points
- Interpreting Circuit Diagrams
- Testing Voltage and Current
- Diagnosing Common Electrical Issues
- Modifying Wiring for Customizations
- Maintaining and Repairing Wiring Systems
Let's take a whimsical journey into the labyrinthine world of 1987 TRX 250 wiring schematics. Strap on your safety goggles and prepare to be electrified, because we're about to embark on a rollercoaster ride through wires, circuits, and maybe a few sparks of humor along the way.
Wires Galore!
Picture this: a jungle of wires resembling a bowl of spaghetti that's been twirled around a fork by a mischievous Italian grandma. That's essentially what you're dealing with when it comes to the 1987 TRX 250 wiring schematics. But fear not, for amidst the chaos lies a method to the madness - or so we hope!
Circuit Conundrums
Ever felt like you're playing an intense game of connect-the-dots, except the dots are actually electrical components and one wrong move could turn your ATV into a fancy paperweight? Welcome to deciphering 1987 TRX 250 wiring schematics, where every circuit diagram feels like a puzzle waiting to be solved.
Shocking Discoveries
Just when you think you've got a handle on things, you stumble upon a wire that seems to defy all logic. It's like finding a unicorn in your backyard - improbable, yet strangely exhilarating. Ah, the joys of exploring 1987 TRX 250 wiring schematics!
Spark of Inspiration
Amidst the confusion and occasional hair-pulling, there's a glimmer of inspiration that strikes like lightning. Suddenly, you understand the intricate dance of electrons as they zip through wires, powering your trusty steed on its off-road adventures. It's a moment of clarity amidst the chaos of 1987 TRX 250 wiring schematics.
As you navigate through the tangled web of wires, you can't help but marvel at the ingenuity of the engineers who designed these schematics. It's like a symphony of electrons orchestrated by master craftsmen, with each wire playing its part in the grand performance of ATV greatness.
But let's not forget the comedic relief that comes with the territory. Who knew that trying to decipher 1987 TRX 250 wiring schematics could be so entertaining? It's like watching a sitcom where the characters are wires and the punchlines are short circuits.
As you delve deeper into the world of 1987 TRX 250 wiring schematics, you can't help but appreciate the sheer complexity of it all. It's a tangled mess of wires, yes, but it's also a testament to human ingenuity and the power of problem-solving. So, grab your multimeter and a cup of coffee - it's time to unravel the mysteries of ATV wiring!
In conclusion, delving into the world of 1987 TRX 250 wiring schematics is like embarking on a wild and wacky adventure. It's a journey filled with twists, turns, and the occasional shock - both literal and figurative. But amidst the chaos, there's a sense of satisfaction that comes from mastering the intricacies of ATV electronics. So, embrace the madness, and remember to keep a fire extinguisher handy, just in case!
In examining the 1987 TRX 250 wiring schematics, it is essential to adopt an academic perspective to fully understand the intricacies and significance of this subject matter. Let us delve into the analysis with a structured approach:
- Historical Context: Understanding the historical context surrounding the development of the 1987 TRX 250 wiring schematics is paramount. This involves delving into the technological advancements and design philosophies prevalent during the era.
- Technical Specifications: Analyzing the technical specifications outlined in the wiring schematics provides valuable insights into the electrical infrastructure of the 1987 TRX 250. This includes details regarding wire gauge, voltage ratings, and circuit configurations.
- Functional Components: Identifying and dissecting the functional components depicted in the wiring schematics is crucial for comprehending the operational mechanisms of the 1987 TRX 250. This encompasses components such as switches, relays, and connectors.
- Electrical Pathways: Examining the pathways through which electrical currents flow within the 1987 TRX 250 wiring schematics elucidates the connectivity between various components. This analysis sheds light on the routing of power and signal transmission throughout the system.
- Diagnostic Capabilities: The wiring schematics serve as invaluable diagnostic tools for troubleshooting electrical issues within the 1987 TRX 250. Understanding how to interpret and utilize these schematics enhances the diagnostic capabilities of technicians and mechanics.
- Modifications and Upgrades: The wiring schematics provide a foundation for implementing modifications and upgrades to the electrical system of the 1987 TRX 250. This facilitates customization according to individual preferences and performance requirements.
- Safety Considerations: An analysis of the wiring schematics also entails a discussion of safety considerations inherent in the electrical design of the 1987 TRX 250. This includes measures to prevent electrical hazards and ensure user safety during operation and maintenance.
- Comparative Studies: Conducting comparative studies between the wiring schematics of the 1987 TRX 250 and subsequent models or other ATVs provides insights into the evolution of electrical engineering practices within the automotive industry.
In conclusion, adopting an academic perspective enables a comprehensive analysis of the 1987 TRX 250 wiring schematics, encompassing historical, technical, functional, diagnostic, and safety aspects. This structured approach facilitates a deeper understanding of the subject matter and its broader implications within the realm of automotive engineering.
When it comes to the 1987 TRX 250 wiring schematics, curious minds often have a plethora of questions. Let's address some of the most common queries:
- What are the key components depicted in the wiring schematics?
- How do I interpret the symbols and codes used in the wiring schematics?
- What is the importance of understanding the wiring schematics for the 1987 TRX 250?
- Are there any common problems associated with the wiring schematics of the 1987 TRX 250?
- Where can I find resources or guides to help me understand the wiring schematics better?
Answer: The wiring schematics for the 1987 TRX 250 typically illustrate key components such as ignition systems, lighting circuits, charging systems, and various sensors. These components are crucial for the electrical functionality of the ATV.
Answer: Interpreting the symbols and codes in the wiring schematics requires a basic understanding of electrical diagrams. Symbols represent different electrical components, while codes indicate wire colors and connections. Consulting a legend or reference guide can aid in deciphering these symbols and codes.
Answer: Understanding the wiring schematics is essential for diagnosing electrical issues, performing modifications or upgrades, and ensuring proper maintenance of the ATV. It provides valuable insights into the electrical infrastructure and operational mechanisms of the vehicle.
Answer: Some common issues include faulty connections, wire corrosion, short circuits, and electrical component failures. Regular inspection and adherence to proper wiring practices can mitigate these problems.
Answer: There are various resources available, including owner's manuals, repair guides, online forums, and instructional videos. These resources provide valuable insights and practical tips for navigating the intricacies of the 1987 TRX 250 wiring schematics.
By addressing these frequently asked questions, we hope to shed light on the fascinating world of 1987 TRX 250 wiring schematics and empower enthusiasts to navigate their electrical adventures with confidence and expertise.
As we draw to a close, it is evident that delving into the intricacies of the 1987 TRX 250 wiring schematics offers a profound understanding of the electrical infrastructure underpinning this iconic ATV. Through our exploration, we have unearthed the historical context, technical specifications, and diagnostic capabilities encapsulated within these schematics.
Furthermore, our analysis has underscored the significance of comprehending the functional components and electrical pathways depicted in the 1987 TRX 250 wiring schematics. These insights not only enhance our appreciation for the engineering marvel of the ATV but also empower technicians and enthusiasts alike to navigate and troubleshoot potential issues with precision and efficacy.
In conclusion, the study of 1987 TRX 250 wiring schematics transcends mere technicality, offering a gateway to a deeper understanding of automotive engineering principles and historical developments. As we bid farewell, I encourage you to continue your journey of exploration and discovery, for the world of automotive schematics is as vast as it is enlightening.
Keywords : ATV wiring schematicsUnderstanding electrical diagramsTroubleshooting techniquesComponent identificationMaintenance tipsResources for enthusiasts
Comments
Post a Comment